 Your environment features a big influence on your state of mind and gratification, and incorporating personality to an area are effortless (and cheap) with Do-it-yourself crafts. Below, we’ll show you a solvent image-transfer task that may be placed on many products, such as timber and textile.
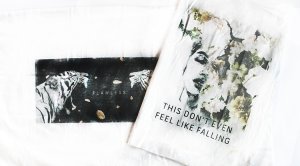
The solvent image-transfer process involves “borrowing” subject-matter from an imprinted material, chemically dissolving it, and moving the image onto a unique surface. We’ll be using the image transfer to canvas tote bags and wood cutting boards, but you can take it one step further and try it on various things of your choice with similar mediums/materials.
Here you will find the steps i personally use for moving photographs to fabric and lumber:
First, think about what imagery or laughter you intend to use. The possibilities are endless; just think a little outside the field. You can choose to print everything from quotes to pictures, and even a design. (Just remember to mirror/reverse every little thing within picture before you printing!) Everyone loves Beyoncé, so I used some verses from her songs as inspiration when it comes to instances here.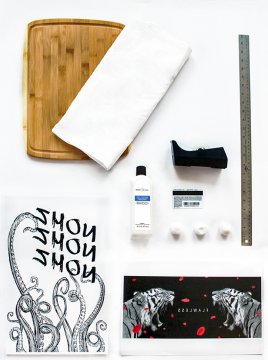 After obtaining imagery, we began to create some styles.
What you should need:
100% acetone (nail-polish cleaner)
Cotton Fiber
Credit cards or other plastic card
Wood/cotton fabric
Tape
Ruler
A mirrored print
Step One
Print a mirrored/reverse version of your image within desired size. It helps if your picture is deeper plus saturated, and so the ink transfers more effectively. You have to use a laser printer, which can be essential because of the toner-based ink. Inkjet printer may bleed too much.
 When you’re willing to start the transfer, make sure you work with a well-ventilated location. Lay your printing image-side upon the textile or lumber area you’ve selected. Tape a side down, if needed, to help keep it positioned, so it does not move during the process. Utilize a cotton baseball or brush and saturate the backside for the printing with acetone.
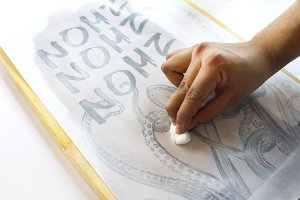
Step 2
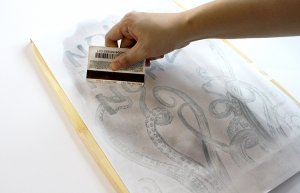 With the card, scrub backwards and forwards throughout the rear of this print. Utilize also stress, and be careful — too much stress may tear your printing. The ink transfers much better once the location you’re burnishing is saturated with acetone, so you may need certainly to re-saturate in the event that acetone starts to dry. Ensuring it's soaked while straight away burnishing the print is essential, given that it can establish a crisper transfer of this printing. If you want to work with smaller sections, it would likely additionally help if printing is huge. Take to practicing on some report, scrap material, or timber to obtain the hang of it very first.
Step Three
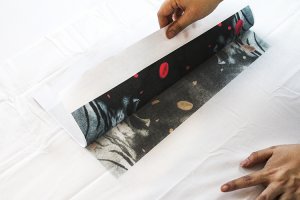
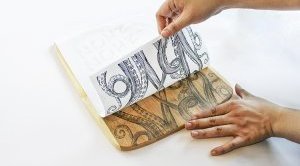
Carefully peel back quite to confirm the transfer, and also to see if you want to burnish much more. If it’s to your pleasure, peel away the whole imprinted paper to show your transported picture.
Step 4
If you are transferring photos to textile, throw the textile using transferred image to the dryer for 10-15 mins as soon as it’s done. The heat will allow the ink settle in to the textile.
If you’re transferring pictures to wood, seal it with a clear coating squirt. (ensure that the spray you use is safe for areas you intend to use all of them for any such thing edible.)
Note: in the event that you plan to make use of work created with Shutterstock possessions to produce actual items, make sure you make reference to our certification terms for appropriate uses.


Share this Post
latest post
-
 Best inkjet printer for envelopes March 28, 2023
 -
 Best Wide Format inkjet printer March 24, 2023
 -
 Inkjet printer for CDS March 20, 2023
 -
 Images of inkjet printers March 16, 2023
 -
 Inkjet T-shirt printer March 12, 2023
 -
 HP Officejet Pro 8600 inkjet e-All-in-One printer March 8, 2023
 -
 Epson software Download for printers March 4, 2023
 -
 Giclee inkjet Printing February 28, 2023
 -
 HP inkjet printers list February 24, 2023