 Printing on fabric using a inkjet printer is super easy and lots fun. It doesn't take long and before you know it, you have beautiful images on fabric to use for your craft and home décor projects. The best type of fabrics for printing on are thin, light weight fabrics such as cotton or muslin. You also want to make sure it's white or a very light color especially if you are printing something very colorful. If your image is black, then it is okay to use colored fabrics as long as they aren't too dark. Other than the fabric, and the inkjet printer, you will need just a few other things which you may already have on hand. Let's get going on the tutorial. I hope you enjoy!
STEP 1
Take the freezer paper and cut it into a letter sized (8.5 by 11) piece. Try to make sure it is as neat as possible. It needs to look like a regular sheet of paper. The freezer paper is going to carry your fabric through the printer.
***Tip*** I actually bought freezer paper already cut into letter sized sheets on Ebay. The brand was C Jenkins Freezer Paper Sheets with 50 in a package but there are other brands as well. That is an option if you would rather do that instead of buying a roll of freezer paper.
STEP 2
Now take the freezer paper and lay it down onto the fabric and cut around it making sure the fabric is about half inch larger around all sides. You want your fabric slightly larger than the freezer paper.
 Now turn your iron on the cotton/linen setting and iron the piece of fabric that you just cut out. Iron both sides and make sure it is completely wrinkle free.
STEP 3
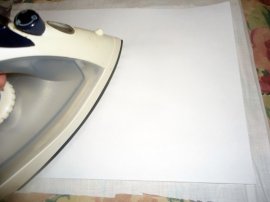
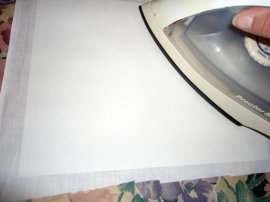
Take the freezer paper and lay it shiny side down onto the ironed fabric piece. Make sure it is centered on the fabric and that you can see fabric around all the edges and then run the iron over the freezer sheet paying special attention to the edges. I run the iron over the sheet for a good 45 seconds or so. You will feel the sheet starting to stick to the fabric while you are ironing. Once you feel confident that it is adhered entirely on that side, turn the piece over and iron the other side, again paying close attention to the edges.
With shiny side down, iron the freezer paper to the fabric. | Source
Turn it over and iron the other side | Source
STEP 4
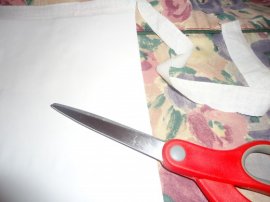
Now what you should have is a piece of fabric with a freezer sheet ironed on. Now go around each edge of the freezer sheet and cut off the excess fabric. Try to cut as neatly as possible around the sheet. You want the lines to be as even as possible with no snags or threads sticking out that could possibly get caught in the printer. Check all corners and edges to make sure the fabric isn't separating from the freezer sheet. If it is, run the iron over it one more time. This is extremely important. You want the entire surface to be adhered before running it through the printer to avoid the fabric getting caught in the printer and possibly damaging it.
Trim the fabric all the way around the contact paper. Cut it as neat as possible. Make sure you have cut off any stray threads from around the edges. | Source

All cut and ready to print | Source
STEP 5
Choose an image or pattern on your computer that you would like to print onto the fabric. Here are a few ideas of things you can print from your computer:
* Your own creations of digital art or word art
* Personal photos
*Free images and patterns from online
*Purchased images and patterns from online
STEP 6
When you have selected the image you would like to print, go into the printer settings and make sure your printer is set to print at high or best quality and also that the selected print size is 8.5 by 11. Once you have done all that, load the sheet into your printer. Be sure you are loading it correctly so that the printer prints on the fabric side of the paper. In my printer, I load it fabric side down.
STEP 7
Once you have it loaded correctly and the printer settings are all correct, all you have to do is click print and watch your lovely printed fabric emerge from the printer.
***Extremely Important*** It's important to stand near the printer during the printing process just in case the fabric gets hung up in the printer. If this happens, push cancel and carefully remove the sheet from the printer. I have never had this happen personally but I'm always extremely careful by making sure that the fabric is completely adhered to the sheet before running it through the printer. This is very, very important to insure that your computer does not become damaged by fabric being caught up in it.
STEP 8
When the fabric is finished printing, simply peel the freezer paper from the back and now you have a gorgeous piece of printed fabric in your design or pattern of choice!
Project Ideas for Printed Fabric
Lets take a look at some of the creative things we can do with the printed images. Here is a few ideas:
- photo quilts
- pillows
- tote bags
- scrapbooking embellishments and altered projects
- table clothes and matching napkins
- use fusible webbing on back to make transfers for t-shirts, bags, etc.
- covered cloth bulletin board
- sachets
- book covers
- use strips of the printed fabric to make wreaths, topiaries, etc.
- fabric flower embellishments
- small sized cloth goody bags
- gift packaging
- and much, much more!
Sealing Your Printed Fabric Images
Unfortunately, inkjet ink is water soluble so if your finished project is going to be something like a pillowcase, photo quilt or anything else that may need to be washed or that might come in contact with water, you will need to treat the fabric beforehand in a solution that will seal in the printed image and make it permanent. Luckily, there is such a solution and it's called Bubble Jet Set 2000 by C. Jenkins Co. It is actually fairly inexpensive and very easy to use! You simply soak your fabric in this liquid for five minutes and then let it dry. Then you go through the rest of the process as outlined above in the tutorial. What you end up with is a permanent printed image on your beautiful finished project that will withstand being exposed to water or repeated washings.


