 In expectation of getting my wedding photographs right back from our professional photographer, i have been dreaming up innovative techniques to show some of our pictures throughout the house. I've always wanted to decide to try moving a photo to wood, therefore I looked up a few tutorials using the internet to see how it really is done. I discovered quite quickly that not all guide around will result in an attractive transfer. Exactly what we discovered i am happy to give out!This project is part of our collaboration with Canon American. We utilized a MG6320 printer to generate this transfer. At tutorials we researched, the only i discovered most readily useful had been from C. Monck. In the video overhead, you can watch me make the wood transfer pictured here from beginning to end. Here you will find the directions alongside additional tips and a few peeks to the numerous unsuccessful attempts:Supplies needed:
-shipping label sheets (I used these)
-Krylon obvious sealer
-Elmer's glue
-Liquitex matte solution (method)
-small sponges
Not pictured:
-ink jet printer
-paint roller (or rolling pin)
-8x10 inch untreated wood (less heavy coloured lumber is preferred)
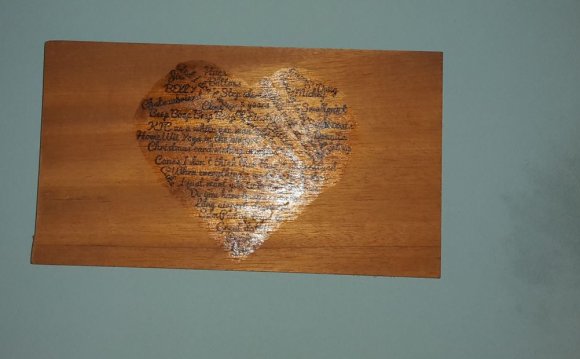
Note: in the event that you intend to make use of a photograph you don't just take yourself (like a wedding image), be sure you possess professional photographer's permission.1.) Eliminate and discard the labels. You merely want the backing paper. 2.) Spray on a thin coat associated with Krylon clear sealer and permit to dried out. 3.) utilize a small sponge to make use of a thin layer of Elmer's glue to your paper. Allow this to totally dry.4.) Print your image onto the paper quietly because of the dried glue. Take care not to smear the image once it has been imprinted. 5.) Use a tiny sponge to put on a thin coat of Liquitex into the timber. While it is still damp, use your photo image-side down to the timber. Make use of a roller to flatten the paper on the wood. Allow this to dried out for 60 minutes. 6.) Very carefully peel back the paper through the transfer and seal with another slim coating of Krylon clear sealer. When that dries, you could add another coating of sealer, like Mod Podge.Now you are prepared display your transfer at home. I simply love the rustic look of timber. :)
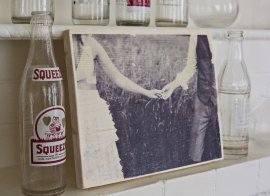
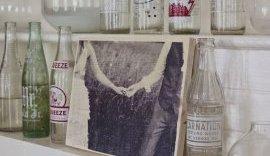
I bet you intend to begin to see the failed attempts, huh? Yeah, I'd also. Right here they are and the things I discovered and extra guidelines that can help you if you are intending to create your very own timber transfer.This one... style of transmitted. Sort of. It's very faint as you can plainly see and was quite in pretty bad shape to utilize as I tried to take away the report. The guide I used for this effort had been nearly the same as the only above except that it don't use clear sealer and it also proposed making use of Mod Podge in the place of Liquitex. I think the Liquitex, although more expensive than Mod Podge, was well worth the investment.Oh dear. This effort ended up being done doing the actual technique taught above, except that as opposed to utilizing a sponge to apply the Elmer's glue, we utilized a paint brush. For me personally, the paint brush left a lot of lines and uneven protection. I would recommend making use of a sponge. Sponge for the winthis This one that one This one this 1 is pretty good, huh? Not too bad. The main concern here ended up being that there had been some bubbling inside paper also it showed when you look at the transferred image (in the region below our hands). For this reason it is critical to utilize a mini paint roller or rolling pin to assist flatten down the paper onto the lumber once the picture transfers over. Say no to bubbles.
When you have any additional concerns, tell us. Or you have completed a lumber transfer task before and now have any tips you'd like to share, feel free. :) Thanks! xo. Emma
 In anticipation of getting my wedding ceremony photos straight back from our photographer, i am dreaming up imaginative how to display some of our photographs at home. I have constantly wished to decide to try moving a photo to timber, therefore I looked up a couple of tutorials online to see how it is done. We discovered pretty quickly that not all guide nowadays will result in a lovely transfer. But what I learned I'm pleased to reveal to you!This project is part of your collaboration with Canon USA. We utilized a MG6320 printer to produce this transfer. At tutorials I researched, usually the one i discovered most useful ended up being from C. Monck. In movie above, you can watch me result in the lumber transfer pictured here from beginning to end. Here are the instructions with additional tips and some peeks in to the many unsuccessful attempts:Supplies needed:
-shipping label sheets (we utilized these)
-Krylon obvious sealer
-Elmer's glue
-Liquitex matte solution (method)
-small sponges
Maybe not pictured:
-ink jet printer
-paint roller (or rolling pin)
-8x10 inches untreated timber (lighter colored lumber is recommended)


Share this Post
latest post
-
 Best inkjet printer for envelopes March 28, 2023
 -
 Best Wide Format inkjet printer March 24, 2023
 -
 Inkjet printer for CDS March 20, 2023
 -
 Images of inkjet printers March 16, 2023
 -
 Inkjet T-shirt printer March 12, 2023
 -
 HP Officejet Pro 8600 inkjet e-All-in-One printer March 8, 2023
 -
 Epson software Download for printers March 4, 2023
 -
 Giclee inkjet Printing February 28, 2023
 -
 HP inkjet printers list February 24, 2023