Measures
Process 1
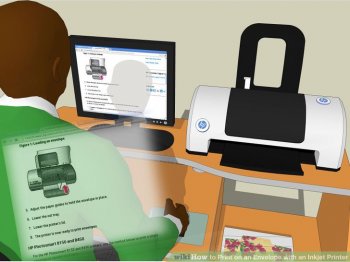
Document and Computer Software Configurations- Create an envelope document. Many programs have actually a wizard that enables you to definitely choose envelope sizes whenever you produce a document exactly the same way that you can choose paper sizes such as A4 or letterhead. Here's what you will need to do in MS keyword 2000 (you can use this as a broad example since similar guidelines apply to various other workplace programs).
- Start MS Keyword 2000.
- Access the File selection in the top-right part and then click on "New."
- Go right to the "Letters and Faxes" tab and choose "Envelope Wizard."
- Key in the distribution target as well as the return address when you look at the appropriate text bins.
- Press the "Alternatives" button to choose the size of the envelope. The default dimensions are Size 10 (4.125 ins by 9.5 inches), but various other sizes can be chosen through the drop-down menu.
- Select feed technique from "Printing Alternatives" tab. The feed technique is the method you are planning use to place the envelope to the printer. It is possible to choose a choice from the different diagrams displaying the envelope becoming provided in various orientations.
Process 2
Printer Settings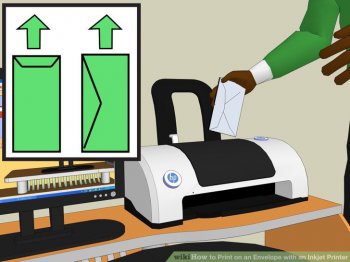
- Have your printer turned-on and connected to the computer that you will send the printing command.
- Put the envelope in input tray (the tray which you generally place empty paper in). Keep carefully the after critical indicators in your mind.
- The direction of envelope ought to be the same as the direction which you selected in Envelope Wizard.
- Ensure that the envelope is dealing with into the correct way. Some printers print on envelope facing up while some print face down. You can use 1st empty envelope as a test to see whether you'll want to place envelopes dealing with up or down.
- Seek the adjustable guides from the feedback tray. You ought to be able to move these guides to fit the dimensions of your envelope within edges. These guides could keep your envelope directly whilst gets into the printer.
- Push the "Print" option to accomplish the steps in wizard. Your envelope may be imprinted with all the addresses that you had entered the text cardboard boxes early in the day.
Community Q&A
Ask a Question
If this concern (or an equivalent one) is answered two times inside part, please just click here to allow us understand.
Tips
- The bundle which has the blank envelopes that you're using must have the envelope dimensions written onto it. You need to use the exact same dimensions to create your envelope document.
- Make use of the Envelope switch regarding taskbar to get into the Envelope Wizard in latter versions of MS term. You can use the wizard to print on an envelope with an inkjet printer in addition to a laser printer.
Warnings
- It is critical to match the adjustable guides on feedback tray towards the measurements of your envelope. Unless you try this, the guides won't keep carefully the envelope directly although it goes into the printer and therefore the written text wont print in straight horizontal lines.
- You may want to adjust computer software options by hand if computer software you are using does not have a wizard for designing and printing envelopes. In such cases, you should access the Print menu as always after which adjust the paper dimensions by hand by picking the right size through the "Scale to paper dimensions" drop-down selection.
Source: www.wikihow.com
Share this Post
latest post
-
 Best inkjet printer for envelopes March 28, 2023
 -
 Best Wide Format inkjet printer March 24, 2023
 -
 Inkjet printer for CDS March 20, 2023
 -
 Images of inkjet printers March 16, 2023
 -
 Inkjet T-shirt printer March 12, 2023
 -
 HP Officejet Pro 8600 inkjet e-All-in-One printer March 8, 2023
 -
 Epson software Download for printers March 4, 2023
 -
 Giclee inkjet Printing February 28, 2023
 -
 HP inkjet printers list February 24, 2023